Use CI to Deploy Android MonoGame Applications
Introduction
If you are currently working on an Android game, even if you just started it or wether it’s a small game, it’s a good habit to use a continuous integration (CI) system.
CI is generally used to make sure that each time you commit some code, it’s compiling without any error and your unit tests are passing successfully. It’s also a good way to find when a bug has been introduced, just testing old builds. But for me, the best advantage of CI is to easily deploy your game on multiple devices without any effort.
Until now, I’ve only used Jenkins to build C++ application, but you need to have your own agent (a machine dedicated to make builds). I also tried Travis CI to launch unit tests of a C# project, they provide Linux agents for free running 24 hours a day, 7 days a week. But this time, I wanted to try a Windows build server, so I did some research and I found AppVeyor.
AppVeyor
AppVeyor is really similar to Travis CI, you can sign in with your Github/Bitbucket or Visual Studio Online and it will automatically retrieved the list of all your repositories. Then, you have 2 choices: you can use the AppVeyor interface directly to setup the actions to perform when a new commit is pushed on your repository or you can add a appveyor.yml script at the root of your repository.
The first solution is the best one if you start to setup your project to avoid multiple commits on your repository just to make the appveyor.yml file work as you expect, but I strongly recommend you to export all settings to the appveyor.yml file when it’s done to keep an history of your future AppVeyor setup changes (you have an option to do that).
Install required dependencies
As indicated in the title, I will take the example of an Android application made with MonoGame. MonoGame 3.6 has just been released officially some days ago, so that’s the version we will use. The very first step before to build our project is to install all needed dependencies: MonoGame of course, but as it’s an Android application, we also need to install Xamarin.
We are on a Windows environment, so we don’t have access to classic Unix shell commands, but we can use PowerShell, that is much more powerfull than and the basic Windows command prompt. Here is how we can install MonoGame using this little PowerShell script:
# Install MonoGame
Write-Host ("Installing MonoGame...")
(New-Object Net.WebClient).DownloadFile('http://www.monogame.net/releases/v3.6/MonoGameSetup.exe', 'C:\MonoGameSetup.exe')
Start-Process -FilePath "C:\MonoGameSetup.exe" -ArgumentList "/S /v /qn"
For Xamarin, it’s a little bit more complicated because you need to be connected to your Xamarin account to be able to perform Android builds. Fortunatly, AppVeyor made a specific page to explain how to resolve this problem. If you follow each steps, you should have a PowerShell script looking like that at the end:
# Install Xamarin
Write-Host ("Installing Xamarin...")
$zipPath = "$($env:APPVEYOR_BUILD_FOLDER)\xpkg.zip"
(New-Object Net.WebClient).DownloadFile('https://components.xamarin.com/submit/xpkg', $zipPath)
7z x $zipPath | Out-Null
Set-Content -path "$env:USERPROFILE\.xamarin-credentials" -value "xamarin.com,$env:XAMARIN_COOKIE"
I’ve already experienced many issues where MonoGame was not completely installed at the end of the PowerShell script, so from now on, I put a sleep instruction of 5 seconds just to make sure that the environment is fully ready before to launch the build:
# Make sure all dependencies are fully installed
Start-Sleep -s 5
Before build
Before to finally build our project, we still need to perform some actions. You should already know for the first one if you really read the Xamarin installation tutorial linked above, but we need to restore the Xamarin component, and this can be done using the Windows command prompt like that:
xamarin-component.exe restore "MyProject.csproj"It’s also before the build that we will increment the Android version to make it specific to the current build. For Android applications, the version is composed of 2 values:
- the versionName that is a string that correspond to the version the users of your app will see on the store. Generally, we describe the app version as a <major>.<minor>.<point>.
- the versionCode that is an integer we increment for each new build.
So the versionName will be changed manually by you when you consider that your application has reach a new step, but here, what we want to update is the versionCode. I wrote a small PowerShell script that will upate the AndroidManifest.xml file, search for the versionCode and replace it by the build number provided by AppVeyor:
$projectPath = "$env:APPVEYOR_BUILD_FOLDER\$env:ANDROID_PROJECT_PATH"

# Load the bootstrap file
[xml] $xam = Get-Content -Path ($projectPath + "\Properties\AndroidManifest.xml")

# Get the version from Android Manifest
$version = Select-Xml -xml $xam  -Xpath "/manifest/@android:versionCode" -namespace @{android="http://schemas.android.com/apk/res/android"}

# Increment the version
[double] $iVer = $version.Node.Value
$version.Node.Value = "$env:APPVEYOR_BUILD_NUMBER"

# Save the file
$xam.Save($projectPath + "\Properties\AndroidManifest.xml")
Build our project
The first thing to know is that using AppVeyor, only Android SDK 19, 20, 21, 22 and 23 are available at the moment when I write these lines, so make sure to update your project configuration consequently, specifically the Android target version.
As we are on a Windows environment, we will use Visual Studio to build our project, and to be more precise: msbuild.exe binary. This time, no need to use PowerShell, the simple command prompt will be enough, we just have to make sure to give it the proper parameters:
msbuild "MyProject.csproj" /verbosity:minimal /t:SignAndroidPackage /p:Configuration=Release /p:Platform=AnyCPU /p:AndroidKeyStore=true /p:AndroidSigningKeyAlias="%ANDROID_KEYSTORE_ALIAS%" /p:AndroidSigningKeyPass="%ANDROID_KEYSTORE_PASSWORD%" /p:AndroidSigningStorePass="%ANDROID_KEYSTORE_PASSWORD%" /p:AndroidSigningKeyStore="%APPVEYOR_BUILD_FOLDER%\%ANDROID_KEYSTORE_PATH%"We want to build for Android target, the Xamarin target name for this platform is SignAndroidPackage (that’s what we put in the command line above), and this require to access to an Android keystore you generated yourself. To do that, you can use the keytool binary located to your %JAVA_HOME%\bin folder with this command:
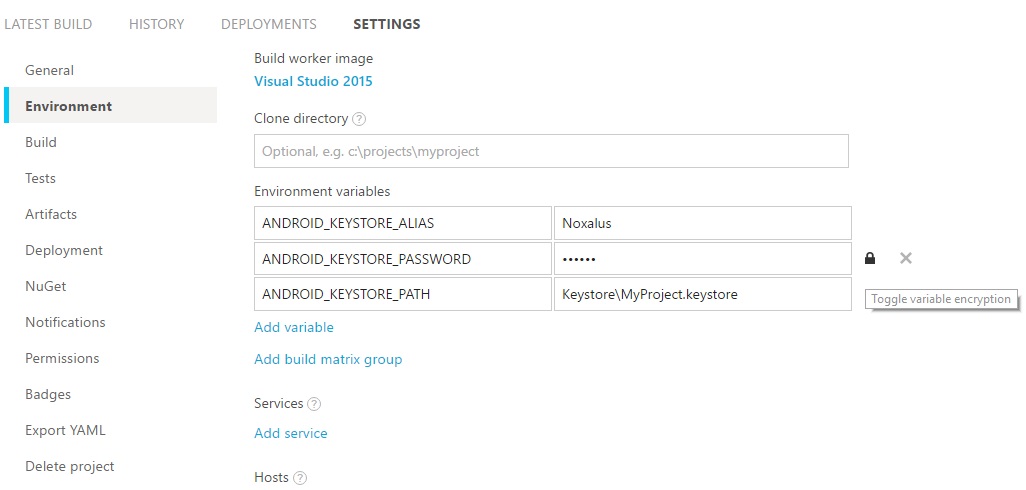
keytool -genkey -v -keystore [KEY_STORE_NAME].keystore -alias [ALIAS_NAME] -keyalg RSA -keysize 2048 -validity 10000Once your keystore successfully generated, put it on your repository to allow AppVeyor to use it to sign the built APK file. Obviously, you also need to provide the alias and passwords of this keystore, the problem is you don’t want to put them on your potentially public repository. That’s why the best way to transmit these information to AppVeyor is using encrypt environment variables. You can do that from the Environment part of the Settings page of your project:

AppVeyor variable encryption
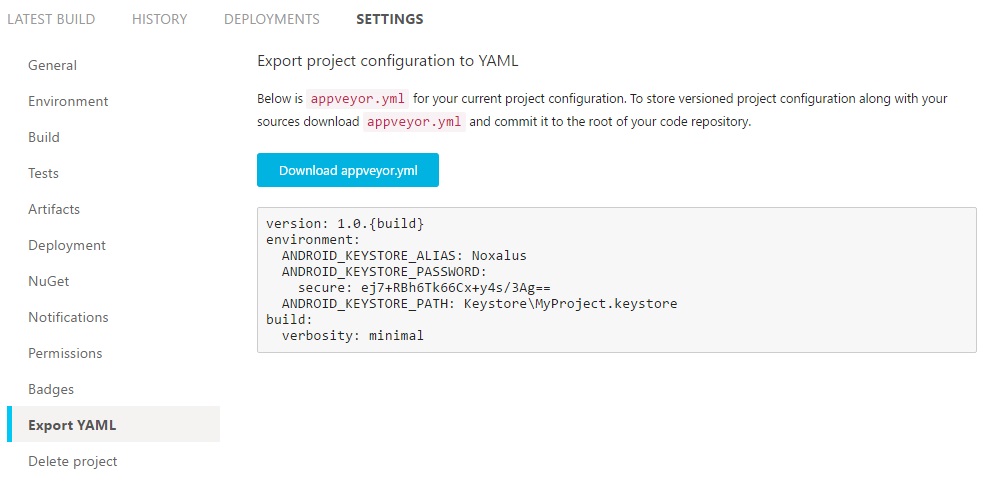
Then, go to the Export YAML part to see the encrypted values:

AppVeyor variable encryption export
You can copy the environment part of this YAML code to your own appveyor.yml have access to these variables in your scripts.
Warning: You HAVE TO use msbuild command with /verbosity:minimal, if this parameter is missing, the passwords of your keystore will be printed in the AppVeyor console, available publicly.
For the next step, I suggest you to rename the generated signed APK file putting the AppVeyor build number in the new name:
rename "%APPVEYOR_BUILD_FOLDER%\%ANDROID_PROJECT_PATH%\bin\Android\AnyCPU\Release\[PACKAGE]-Signed.apk" "[PROJECT_NAME]-%APPVEYOR_BUILD_NUMBER%.apk"Deploy to HockeyApp
The last step of our journey consist to uploading the produced APK to HockeyApp to make it easily available to any device that you want. To do that, you need 2 things:
- An active HocketApp API token that you can find or create on this page (you need to be connected).
- The HockeyApp App ID that you can find on the Overview page of the application (you need to create it before, and you don’t need to provide an APK file to do it)
If your HockeyApp API token and App ID have been stored as environment variable like we did above for the Android keystore values (respectively into HOCKEYAPP_API_TOKEN and HOCKEYAPP_APP_ID variables), this PowerShell script will do the job.
$uri = "https://rink.hockeyapp.net/api/2/apps/$env:HOCKEYAPP_APP_ID/app_versions/upload"
$filePath = "[PATH_TO_APK]"
$method = "POST"
$param = "ipa"
$header = @{"X-HockeyAppToken"="$env:HOCKEYAPP_API_TOKEN"}

function Get-AsciiBytes([String] $str) {
  return [System.Text.Encoding]::ASCII.GetBytes($str)
}

function Send-Multipart {
  param (
    [parameter(Mandatory=$True,Position=1)] [ValidateScript({ Test-Path -PathType Leaf $_ })] [String] $FilePath,
    [parameter(Mandatory=$True,Position=2)] [System.URI] $URL,
    [parameter(Mandatory=$True,Position=3)] [String] $Method,
    [parameter(Mandatory=$True,Position=4)] [String] $Param,
    [parameter(Mandatory=$True,Position=5)] [System.Collections.IDictionary] $Headers
  )

  [byte[]]$crlf = 13, 10

  $body = New-Object System.IO.MemoryStream

  $boundary = [Guid]::NewGuid().ToString().Replace('-','')

  $encoded = Get-AsciiBytes('--' + $boundary)
  $body.Write($encoded, 0, $encoded.Length)
  $body.Write($crlf, 0, $crlf.Length)

  $encoded = (Get-AsciiBytes('Content-Disposition: form-data; name="status"'))
  $body.Write($encoded, 0, $encoded.Length)
  $body.Write($crlf, 0, $crlf.Length)
  $body.Write($crlf, 0, $crlf.Length)

  $encoded = (Get-AsciiBytes "2")
  $body.Write($encoded, 0, $encoded.Length)
  $body.Write($crlf, 0, $crlf.Length)

  $encoded = Get-AsciiBytes('--' + $boundary)
  $body.Write($encoded, 0, $encoded.Length)
  $body.Write($crlf, 0, $crlf.Length)

  $fileName = (Get-ChildItem $FilePath).Name
  $encoded = (Get-AsciiBytes('Content-Disposition: form-data; name="' + $Param + '"; filename="' + $fileName + '"'))
  $body.Write($encoded, 0, $encoded.Length)
  $body.Write($crlf, 0, $crlf.Length)

  $encoded = (Get-AsciiBytes 'Content-Type:application/octet-stream')
  $body.Write($encoded, 0, $encoded.Length)
  $body.Write($crlf, 0, $crlf.Length)
  $body.Write($crlf, 0, $crlf.Length)

  $encoded = [System.IO.File]::ReadAllBytes($filePath)
  $body.Write($encoded, 0, $encoded.Length)

  $encoded = Get-AsciiBytes('--' + $boundary)
  $body.Write($crlf, 0, $crlf.Length)
  $body.Write($encoded, 0, $encoded.Length)

  $encoded = (Get-AsciiBytes '--');
  $body.Write($encoded, 0, $encoded.Length);
  $body.Write($crlf, 0, $crlf.Length);

  try {
    Invoke-RestMethod -Headers $Headers -Uri $URL -Method $Method -ContentType "multipart/form-data; boundary=$boundary" -TimeoutSec 120 -Body $body.ToArray()
  }
  catch [System.Net.WebException] {
    Write-Error( "FAILED to reach '$URL': $_" )
    throw $_
  }
}

Send-Multipart $filePath $uri $method $param $header
Conclusion
At the end, the appveyor.yml should looks like that:
version: 0.0.{build}
environment:
  XAMARIN_COOKIE:
    secure: Ut8C5dcSVEh3A8IZHlj39DBV/bP4KCxzsnovjgt55gYc0OYlWQwP/fAwl7DFtdR4
  HOCKEYAPP_APP_ID:
    secure: qbJ09dkcmcsS8wznuDU6lNgt4h2htHhGLhGj1/V6SyIg97j31U51BNb5t3pDuMVF
  HOCKEYAPP_API_TOKEN:
    secure: j0zM29SX82jirzfqpDjMKLVDuGCtnnhjAlfCW9VW13WihwhSyfJTzRmmqb4pjojM
  ANDROID_KEYSTORE_ALIAS:
    secure: n8AJ+/2dLtjovNej5PHJ1g==
  ANDROID_KEYSTORE_PASSWORD:
    secure: AU+rxD9IAqrN12v1cbTCSmFfqsNq5HZELytgwv4WW80=
  ANDROID_KEYSTORE_PATH: Keystore\MyKeystore.apk
  ANDROID_PROJECT_PATH: Project\Project-Android
  ANDROID_PROJECT_FILENAME: Project-Android.csproj
install:
  - ps: '& ./Scripts/InstallDependencies.ps1'
before_build:
  - xamarin-component.exe restore "%ANDROID_PROJECT_PATH%\%ANDROID_PROJECT_FILENAME%"
  - ps: '& ./Scripts/UpdateAndroidVersion.ps1'
build_script:
  - msbuild "%ANDROID_PROJECT_PATH%\%ANDROID_PROJECT_FILENAME%" /logger:"C:\Program Files\AppVeyor\BuildAgent\Appveyor.MSBuildLogger.dll" /verbosity:minimal /t:SignAndroidPackage /p:Configuration=Release /p:Platform=AnyCPU /p:AndroidKeyStore=true /p:AndroidSigningKeyAlias="%ANDROID_KEYSTORE_ALIAS%" /p:AndroidSigningKeyPass="%ANDROID_KEYSTORE_PASSWORD%" /p:AndroidSigningKeyStore="%APPVEYOR_BUILD_FOLDER%\%ANDROID_KEYSTORE_PATH%" /p:AndroidSigningStorePass="%ANDROID_KEYSTORE_PASSWORD%"
  - rename "%APPVEYOR_BUILD_FOLDER%\%ANDROID_PROJECT_PATH%\bin\Android\AnyCPU\Release\io.noxalus.Project-Signed.apk" "Project-%APPVEYOR_BUILD_NUMBER%.apk"
deploy_script:
  - ps: '& ./Scripts/AndroidHockeyAppUpload.ps1'
If you want to look at a real MonoGame project that use AppVeyor and HockeyApp like explained in this post, you can check the sources of my last Android project.